Compress Files Faster Using Pigz on Linux
Pigz is a faster compression tool. Learn how to use it for generating .gz compressed file faster in Linux.

I have a pretty good reason why you should replace gzip with pigz utility.
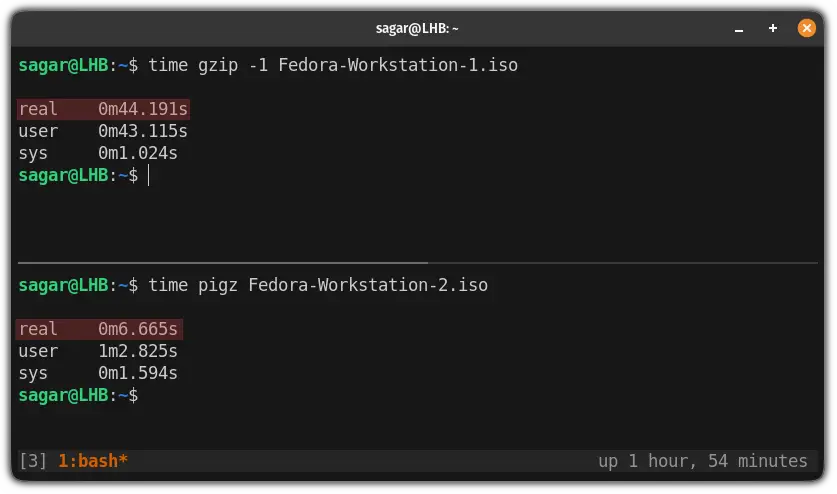
Yes, that's the performance and the difference is huge:
And as you can see, even using gzip command with the fastest compression possible, took 44 seconds.
Whereas with the default speed, the pigz only took 6.5 seconds.
So with the above results, pigs is 6.75 times faster than gzip!
And the best part is you can make it even faster. Seems like a fair deal? Here's how you install and use it.
How to use the pigz command in Linux
You may be wondering how the pigz can be so fast. Well, the answer is hidden in its name.
Parallel Implementation of GZip (pigz).
This means it will use multiple cores and processors making it an excellent replacement for gzip command.
But it does not come pre-installed but can be installed through the default repository.
Such as for Ubuntu/Debian-based distros:
sudo apt install pigzFor Arch-based distros:
sudo pacman -S pigzFor Fedora/RHEL base:
sudo dnf install pigzNow, let's jump to the examples!
Compress files using the pigz command on Linux
To compress files using the pigz command, all you need to do is append the filename or path to the file and it will get your job done:
pigz Target_fileFor example, here, I compressed a Fedora ISO file:
And if you notice carefully, it will remove the original file. So what if you want to keep the original file? Here's how you do it:
Keep the original file while performing compression on Linux
To keep the original file, all you need to do is use the -k flag:
pigz -k Target_fileFor example, here, I will be using the same Fedora ISO file and will use the ls command to show the contents of the directory:
And as you can see, the original file is as it is!
Speed up the compression process using the pigz command
The pigz command supports compression levels from 1 to 9.
Where,
- Level 1 offers the fastest but the least compression.
- Level 6 is what is used by default.
- Level 9 offers the slowest but the best compression.
So let's say if I want to apply level 1 compression, I will have to use the -1 flag whereas to use level 9, the -9 flag is used.
For example, Here, I will be using level 1 compression:
pigz -1 Targeted_fileAnd as you can see, it only took 5 seconds to compress a file worth 2GB in size!!!
Allocate the number of cores for compression using the pigz command
As I mentioned earlier, the pigz utility uses multiple cores and processors, you can also manually specify how many cores should be allocated to the process.
And if you want to know the number of CPU cores, you can use the nproc command:
nprocOnce you know how many cores you have, you can use the -p flag to specify the number of processing cores.
For example, here, I allocated 6 cores for the compression process:
pigz -p4 Targeted_fileZip files faster using the pigz command on Linux
Yes, you can use the pigz command to zip files on Linux.
To zip files using the pigz command, you will have to use the -K or the --zip flag:
pigz --zip Targeted_fileWant to know how you can unzip the files? We have a detailed guide for that purpose:
Uncompress files using the pigz command
The pigz command can also be used to decompress the files.
To uncompress files, all you need to do is use the -d flag:
pigz -d Compressed_filePretty cool! Right?
Wrapping Up
This was a quick tutorial on how you can use the pigz command on Linux. I have been using this tool for over a month now and I'm not going to gzip command.
And if you have any queries or suggestions, let me know in the comments.
A software engineer who loves to tinker with hardware till it gets crashed. While reviving my crashed system, you can find me reading literature, manga, or watering my plants.


