How to Use Linode StackScripts for Deploying PreConfigured Linux Servers
Automate repetitive task and deploy custom configured Linux server with Linode StackScripts.

There are always a few things to do after deploying a new Linux server. It could be changing the SSH configuration, creating non-root users or installing and configuring Docker.
These are all repetitive tasks that could be especially frustrating when you're testing something and you have to deploy servers with the same configuration.
For example, I use reverse proxy setup to test out different kinds of web services and applications. Doing all those steps again and again on all the new servers could be such a pain.
Thankfully, Linode, our infrastructure provider has a handy solution in the form of StackScripts.
In this tutorial, I'll tell you the following things:
- What are Linode StackScripts?
- How to use those StackScripts while deploying servers with Linode?
- Tips on creating your own StackScript
- Deploy a reverse proxy setup using StackScripts created by Linux Handbook team (that's us)
This tutorial works only with Linode cloud server provider. If you are not using it, you can sign up with this link to get $60 free credits for two months.
What is a StackScript?
It is a script that is run after a server is successfully deployed. This script doesn't have to be a shell script, it can be written in Python or Perl, as long as the interpreter is there, all you need is to make sure you use the correct shebang!
With a StackScript, you can automate some of the more monotonous tasks of post-deployment necessities. Some of them are listed below:
- Creating a non-root user.
- Changing SSH server configuration (e.g. Disabling password authentication).
- Installing some of the packages you want like Python, Docker, Ruby etc.
- Updating and rebooting the server.
Sounds like the feature Dockerfile provides, right? It's similar concept here.
Types of StackScripts
Well, they aren't exactly "types". It depends on how you're interpreting the idea of a type. If you distinguish two scripts by the language (i.e. the interpreter) it's written in, there are as many types of StackScripts as there are interpreters found in a specific distribution image like Python, Perl, Bash, Csh, Fish, Ksh, etc.
Here I'm distinguishing StackScripts by their availability. Depending on the availability there are two kinds of StackScripts:
- Account StackScripts
- Community StackScripts
Account StackScripts
These are your private scripts that you have created yourself and haven't made public yet.
If you log into your Linode account, you'll find it in the "Account StackScripts" tab under "StackScripts" on the left side panel.
Community StackScripts
Scripts that you and others have made publicly available through Linode portal.
You can find it in the same place beside "Account StackScripts".
Hands-on 1: Create a simple StackScript and deploy a new server with it
To follow along, you're going to need a couple of things first:
- A Linode account. If you're part of an organization, and one of the administrators created an account for you, make sure your account has the necessary permissions to operate with StackScripts.
- Some command line or shell scripting knowledge. You may always follow our Bash Beginner Series.
Creating a simple StackScript
In this example, you'll create a bash script that'll create a non-root user and copy over the SSH key details to this user. It doesn't do much but is enough to understand the basics.
The username and passwords are going to be hardcoded in this example and I don't recommend that in any environment. I have created a stackscript to achieve similar functionality, which I'll share in a moment.
Go to the StackScript window, and click on the "Create a StackScript" button.
You'll now see a couple of text fields. Here's what you need to do:-
- First, give your script a label. Make sure this is unique to your account StackScript list.
- Next, describe the purpose of the script. This is optional.
- "Target Images" are basically which distributions you're making this StackScript for. The commands or interpreter you're going to use, might not be present in one distribution by default, but present in another. Make sure you choose the correct image[s] here. For now, select Ubuntu 20.04
Finally, the script part. Here copy and paste the following code
#!/bin/sh

useradd \
    -mG sudo \
    -s /bin/bash \
    -p $(awk -F: '$1 ~ /^root$/ {print $2}' /etc/shadow) \
    noroot

if test -d /root/.ssh; then
    cp -r /root/.ssh /home/noroot && \
        chown -R noroot:noroot /home/noroot/.ssh && \
        chmod 700 /home/noroot/.ssh
fi

rm -f /root/StackScript
The script does the following
- Creates a non-root user, named
noroot, with the same password as the root user. - If you have added SSH keys to your Linode, the script will copy the
.sshdirectory to the non-root user's home, and configure the required ownership and permissions. - The StackScripts is stored in
/rootunder the nameStackScript, the last line deletes the script from the disk.
Once everything is done, click on "Save".
Deploy server using the StackScript
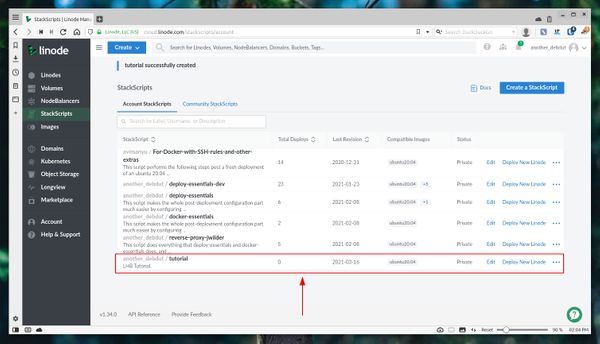
You now should see the StackScript in your account StackScript list. If you don't, reload the page.
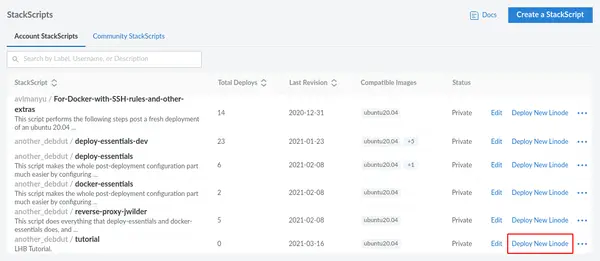
Here, on the far right side, click on "Deploy New Linode".
Another method is to select StackScripts to be the deployment method on the Linode creation page like in the picture below.
Afterward, go on with your Linode creation as you're used to. Once the status of your Linode is "running" on your dashboard, wait for a couple of seconds and use SSH to log into the server, but not as root, as the noroot user.
ssh noroot@ip
You should be able to log in as this new user.
Hands-on 2: Deploying server using StackScripts created by Linux Handbook
At Linux Handbook, we do a lot of testing and configuring. You can see that in our deployment tutorials. To help out our readers like you, we have lately started creating StackScripts.
With our StackScripts, you can deploy servers with rather complicated configurations. Take Nginx reverse proxy set up with Docker for example. If you want to use that awesome set up, just use the StackScript and save plenty of your time.
You can find the LHB StackScripts on our GitHub repository.
Here I'll walk you through the reverse proxy deployment using reverse-proxy-jwilder StackScript.
First head over to the community StackScript section, and search for "reverse-proxy-jwilder". You should see a script named as such "another_debdut/reverse-proxy-jwilder".
Like before, click on the "Deploy New Linode" button. Now you should see a couple more input fields than what you're used to.
Let me explain the options:
Create a non-root user
Using the root user always in a production environment isn't the best idea. But Linode doesn't have the option to create a non-root user while deploying a server. This script takes care of that.
The user creation is optional because there are times when a small test needs to be performed, and it's easier to use the root user for the time being.
Non-root user password
This is again optional. If you leave this blank the root password will be reused for the non-root user.
Upgrade the system
You may not want to upgrade the system sometimes, since it can take a while.
SSH port
First, it asks for a port number for the SSH daemon to run, defaults to port 22. I recommend setting it to something different and do remember that as this change won't be reflected on your dashboard.
Based on other information, the script configures other parts of SSH as well. For example, if you add a user, root won't be accessible through SSH, if at least one public key is provided, password login is disabled.
Lock the root account
You can also lock the root user right from the deployment screen. This is one of the standard SSH hardening tricks.
Docker group
Since docker is going to be installed, you can add your non-root user to the docker group automatically from here.
That's about it. Once done, go along with how you normally deploy a server.
You'll need to wait quite a while for the whole process to complete. Meanwhile, after logging in you can check the logs using the tail command:
tail -f /var/log/stackscript.log
If you see some bug with these StackScripts or want to see some custom script being made, open an issue on Linux Handbook GitHub repository. Contributions are always welcome.
To learn more about StackScripts, you can read their official documentations here.


